Locking Down Your Office 365 Mail Server
Follow the steps in this guide to lock down your inbound email flow in Office 365 to only accept email from SpamTitan Cloud IP addresses.
Notice
The instructions below include information about tools that are not owned or managed by TitanHQ and are only intended as a guideline to help you. As such, the information may be subject to change without us knowing.
If you notice anything out of place, please email docs@titanhq.com and let us know.
Follow the steps below to lock down your inbound email flow in Office 365 to only accept email from your SpamTitan. This requires you to create a receive connector in Office 365.
Log on to your Office 365 Exchange Admin Center (EAC).
Note
If you are using Microsoft 365 Defender, log in to security.microsoft.com and select Exchange message trace from the sidebar menu to open your Exchange Admin Center.
Click Mail flow and then Connectors from the sidebar menu to view your connectors.
Click
 Add a connector and the 'New connector' window displays. Select Partner organization as shown:
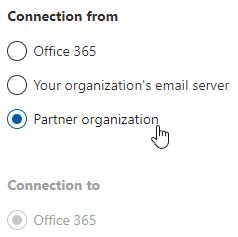
Click Next and the 'Connector name' window displays.
In the Name: field give the connector a meaningful name. For example, SpamTitan to Office 365. Click Next.
In the 'Authenticating sent email' window:
Select By verifying that the sender domain matches one of the following domains.
Enter * in the dialog box and click
 .
.
Click Next.
In the 'Security restrictions' window:
Check Reject email messages if they aren't sent over TLS.
Important
This option requires that outbound TLS is enabled in SpamTitan.
Select Reject email messages if they aren't sent from within this IP address range and enter your SpamTitan IP address.
Note
See SpamTitan Cloud IP addresses for shared cloud IPs, or enter your own private SpamTitan IPs if using SpamTitan Private Cloud.
Click
to save the IP you entered:
Click Next.
The 'Review connector' page displays the information you have entered above. Verify the information is correct and click Create connector.