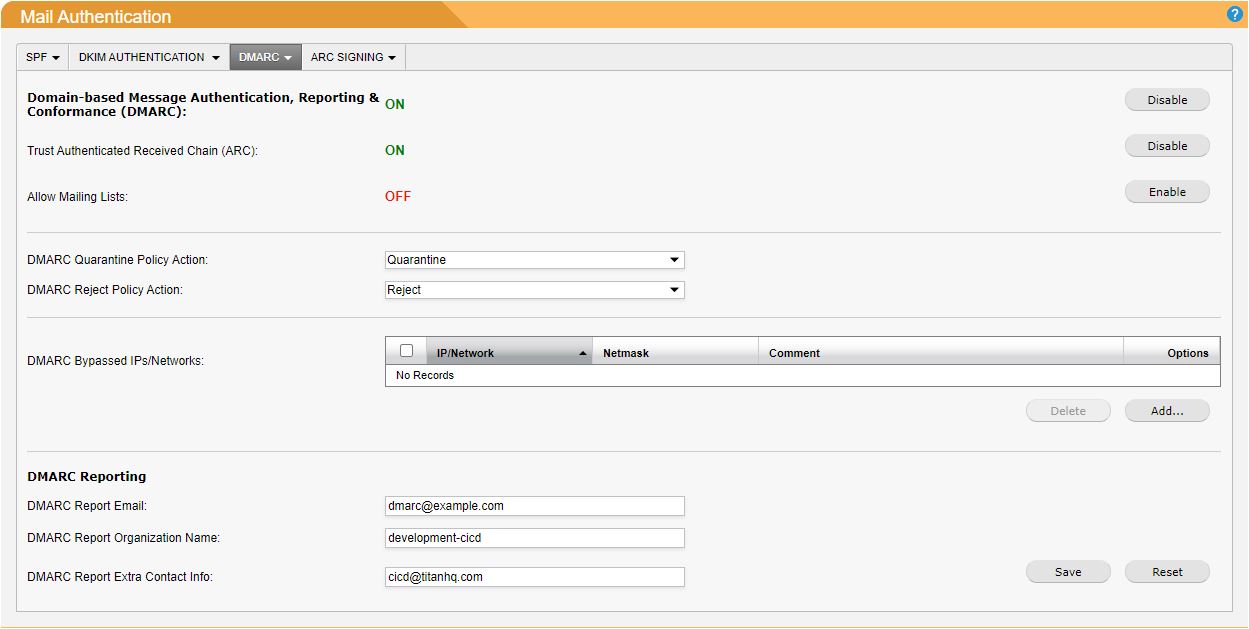
Enabling and Configuring DMARC in SpamTitan
Follow these steps to enable and configure DMARC (default: disabled).
Go to System Setup > Mail Authentication > DMARC.
Click Enable opposite Domain-based Message Authentication, Reporting & Conformance (DMARC):. This enables DMARC and expands the window to show additional DMARC settings:

Trust Authenticated Received Chain (ARC): (default: disabled). Not all mail goes directly from the sender to the recipient. Some intermediaries might make changes to an email before forwarding it, which could result in the email failing SPF, DKIM or DMARC.
ARC helps preserve email authentication results and verifies the identity of email intermediaries that forward a message on to its final destination. However, ARC is open to abuse by spammers, so enable with caution.
Allow Mailing Lists: (default: enabled). Mailing lists can be problematic and may result in email failing DMARC, so it is recommended to leave this setting enabled.
DMARC Policies: DMARC records can determine a policy that specifies what to do with a mail that fails DMARC checks. The policy can specify:
None: the receiving server takes no action if DMARC has failed. In SpamTitan, no action will be taken on DMARC failures and the email will be processed as normal.
Quarantine: the receiving server stores the mail for review (and possible release). As long as you are not overriding this policy action, the email will be accepted in SpamTitan for delivery and quarantined before any virus or spam checking takes place.
Reject: the sender has a close-to-zero chance of false positives and mail should not be allowed on the recipient server if it fails DMARC. In SpamTitan, DMARC rejects will result in the sending client receiving a 5XX reject response after the end of the DATA command.
SpamTitan gives the option to override what action to take for Quarantine and Reject policies:
For DMARC Quarantine Policy Action: select No Action (none), Quarantine or Reject from the drop-down menu.
For DMARC Quarantine Reject Action: select No Action (none), Quarantine or Reject from the drop-down menu.
DMARC Bypassed IPs/Networks: IP addresses and networks can allow DMARC authentication by adding them to the DMARC Bypassed IPs/Networks list.
To add an entry to the list, click Add.... The DMARC window displays. Using the table below as a reference, add details of the new entry. Click Save to save changes or Cancel to discard changes.
Field
Description
IP/Network:
Enter an individual IP address or network range to allow DMARC checks.
Netmask:
Select the netmask for the IP address. Individual IPv4 addresses will have a /32 (255.255.255.255) netmask.
Address Type:
Select IPv4 or IPv6. (default: IPv4)
Comment:
Enter an optional comment for this entry.
To edit an entry for an existing entry, click on the edit
 icon in the Options column to the right of the entry you want to edit. Click Save to save changes or Cancel to discard changes.
To delete an entry, click on the delete
 icon in the Options column to the right of the entry you want to delete.
DMARC Reporting: If a message fails DMARC, it is important to notify the sending domain so its administrators can make adjustments if it was a false positive and prevent further occurrences.
The following report settings allow you to specify an email address, organization name and additional contact information that will be used when sending a DMARC report:
Field
Description
DMARC Report Email:
Email address the report will be sent from. Default is dmarc@domain.com, where domain.com is specified in System Settings > Network > DNS Settings.
DMARC Report Organization Name:
Organization name displayed on the DMARC report. Default is the organization name on your SpamTitan license.
DMARC Report Extra Contact Info:
Enter additional contact information, e.g. name or email address. Default is the mail address on your SpamTitan license.
Click Save to save changes or Reset to revert to default settings.