Dynamic Recipient Verification using MS Exchange 2013 and 2016
With Exchange 2013, Microsoft altered the behavior of the Exchange FrontEnd Transport service, which affects SpamTitan’s Dynamic Recipient Verification. Read this workaround.
Since the release of Exchange 2013, Microsoft has altered the behavior of the Exchange FrontEnd Transport service so that it no longer rejects invalid recipients after they are specified. Instead, the rejection is performed after the DATA command has been issued which breaks Dynamic Recipient Verification in SpamTitan.
As a workaround, access must be given to the Default HubTransport connector which is still SMTP compliant, and rejects invalid recipients after they are specified using the RCPT TO command. By default, the Default HubTransport connector is accessed on port 2525.
Notice
The instructions below include information about tools that are not owned or managed by TitanHQ and are only intended as a guideline to help you. As such, the information may be subject to change without us knowing.
If you notice anything incorrect, please email docs@titanhq.com and let us know.
Check if Exchange Anti-Spam Agents are installed
This check can be performed using the Exchange Management Shell (EMS). Open EMS and issue the following command:
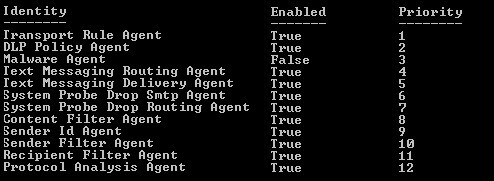
Get-TransportAgentResults similar to these should return if the Anti-Spam Agents are installed - check if Recipient Filter Agent is listed:
If Recipient Filter Agent is not listed, issue the following command to install the Exchange Anti-Spam Agents:
& $env:ExchangeInstallPath\Scripts\Install-AntiSpamAgents.ps1Ensure the Recipient Filtering Agent is enabled
Issue the following command again to verify that Recipient Filter Agent has been installed and is enabled:
Get-TransportAgentIf Recipient Filtering Agent is not enabled (true), run the following command to enable:
Enable-TransportAgent “Recipient Filter Agent”Restart the Microsoft Exchange Transport service.
Ensure AddressBook is enabled
You need to verify that your accepted domains are using Address Book to check for valid recipients. By default, this is enabled when you set Exchange as an authoritative Mailbox Server for your domain. To check, run the following from the shell:
Get-AcceptedDomain | Format-List Name,AddressBookEnabledYou will get a list of all accepted domains and whether Address Book is enabled or not. If Exchange is authoritative, but Address Book is disabled, enable it with the following:
Set-AcceptedDomain <name of accepted domain> -AddressBookEnabled $trueTo enable for all domains:
Caution
Ensure sure you are not relaying any domains before running these scripts.
For Exchange 2013 use:
Get-AcceptedDomain | Set-AcceptedDomain -AddressBookEnabled $trueFor Exchange 2016 use:
Get-AcceptedDomain | ? {$_.AddressBookEnabled -ne "True"} | Set-AcceptedDomain -AddressBookEnabled $true
Restart the Microsoft Exchange Transport service.
Check Tar-Pit Settings
If tar-pitting is enabled on your MS Exchange server and set to the default delay of 5 seconds, dynamic recipient verification may experience timeouts as it waits five (5) seconds for a response.
If tar-pitting is enabled on your Exchange server, set the delay to one (1) second. See https://social.technet.microsoft.com/wiki/contents/articles/52447.exchange-2016-set-the-tarpit-levels-with-powershell.aspx

Ensure Recipient Validation is enabled
Recipient Filter should now be enabled on your mailbox server and Address Book should be enabled on your domain. However, if you test this it may not be working if Validation is still disabled. To check, run:
Get-RecipientFilterConfig | FL Enabled,RecipientValidationEnabledIt should return that Recipient Filter is enabled, but if validation is not enabled, run this command:
Set-RecipientFilterConfig -RecipientValidationEnabled $trueRestart the Microsoft Exchange Transport service.
Allow access to the Default receive connector
From the Exchange Administrative Cente go to Mail Flow > Receive Connectors.
Edit the "Default <servername> connector", go to the Security tab and ensure that Anonymous users are allowed. This allows connections to this Receive connector so it can be used for Dynamic Recipient Verification, but mail cannot be delivered directly via this connector. By default, this connector can be accessed on port 2525.
If SpamTitan accesses your mail server via a firewall, open your firewall and forward port 2525 to your Exchange server. Access to this port can be restricted to your SpamTitan IP addresses(es).
Test Recipient Filtering
You can test Recipient Verification through the additional port by telnetting to that port. For example, telnet mail.domain.com 2525.
Note
Telnet is no longer installed in Windows by default. You can install it in Windows Control Panel > Programs & Features, or use a third-party client such as PuTTY
 .
.Below is a sample test, with the commands you have to enter in bold. Replace @your_domain.com with a domain hosted by your mail server.
220 ex2013.domain.com Microsoft ESMTP MAIL Service ready at Tue, 18 Mar 2020 20:39:41 +0100ehlo server.com250-ex2013.domain.com Hello [192.168.***.***]mail from: <email@external.com>250 2.1.0 Sender OKrcpt to: <fakeuser@your_domain.com>550 5.1.1 User unknownConfigure SpamTitan to use port 2525 for dynamic recipient verification
Go to System Setup > Mail Relay > Domains and edit
 the domain.
Select Dynamic Recipient Verification from the drop-down menu and enter your mail server IP or hostname followed by :2525. For example, 192.168.0.1:2525 or mail.domain.com:2525.
Note
If you are running multiple exchange servers behind an Exchange Edge or Transport server, you need to ensure that the antispam agents are installed on all of them. Therefore, Step 1 needs to be carried out on all mailbox servers, not just the Edge server.
Disable the other Anti-Spam Agents (optional, but recommended)
You may want to disable the other Anti-Spam Agents so that ONLY recipient verification is enabled. This prevents issues such as your Exchange server blocking the SpamTitan Quarantine Report. This report contains a list of subject lines from spam emails and may be blocked as spam by the Content Filter Agent:
Set-SenderFilterConfig -Enabled $falseSet-SenderIDConfig -Enabled $falseSet-ContentFilterConfig -Enabled $falseSet-SenderReputationConfig -Enabled $falsePerform these one at a time since they each require an answer of “Y”:
Disable-TransportAgent "Sender Filter Agent"Disable-TransportAgent "Sender ID Agent"Disable-TransportAgent "Content Filter Agent"Disable-TransportAgent "Protocol Analysis Agent"