Adding a Dynamic IP Customer Location
Important
For WebTitan Cloud to continue identifying a location as a dynamic IP address changes, you must install WebTitan Dynamic IP Agent. When this agent is downloaded and installed (with the generated location key) on at least one computer in your network, it will automatically update WebTitan Cloud as the IP changes.
Follow these steps to add a dynamic IP location:
Go to Customer Settings > Locations > Dynamic IP. Click Add and the following window displays:
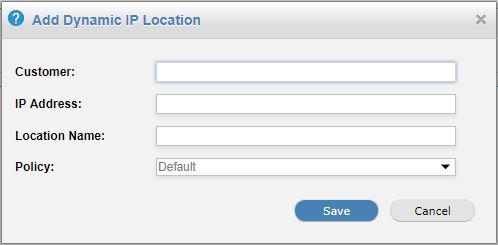
Enter an existing customer name in the Customer: field. The field will auto-populate as you type.
In the IP: field, enter your customer's current IP address.
In the Location Name: field, assign a name for this location, e.g. Customer-name Main Office.
Note
A good naming convention and consistent descriptions for your customers locations will make viewing history and reporting easier to manage.
By default, the default customer policy is assigned to all new customer locations.
A customer admin can go to Settings > Locations within the Customer Admin interface to change this to a different policy, or a service provider admin can impersonate a customer within the Service Provider interface. See Impersonating a Customer.
Click Save to save this location.
A location key is generated and displayed in the Location Key column. Use this key to configure the Dynamic IP Agent during installation:
