How to Schedule a Report in WebTitan Cloud
Depending on the amount of data you have it may take several minutes to compile a report, so you may want to save and schedule a report to run periodically. Follow the steps below to schedule a report:
Firstly, you must create the report you wish to save and schedule. See Generating a Report.
When you have created your report, scroll to the bottom of the window and you will see this toolbar:

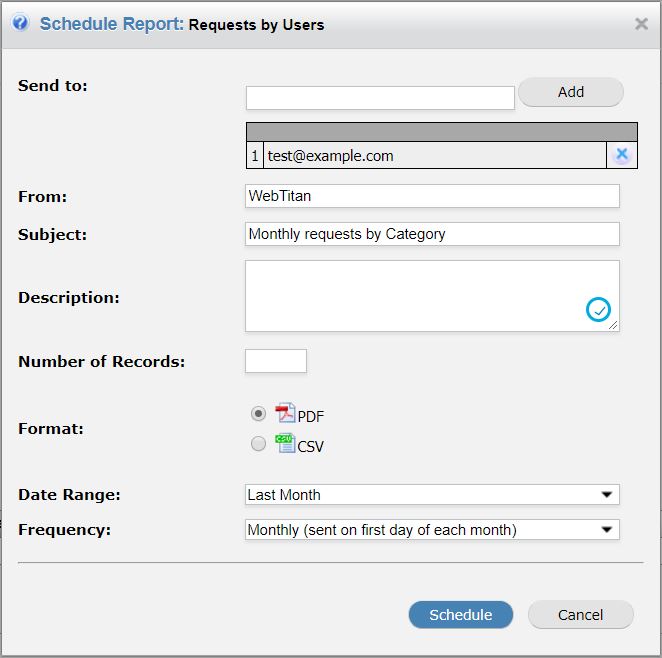
Click Schedule Report and the Schedule Report window displays. Using the Scheduled Report Settings table below as reference, complete the fields in this window.

Click Schedule to save and schedule your report or Cancel to discard your entry.
Your report has now been saved and scheduled. To view or modify the report see Viewing, Editing & Deleting Scheduled Reports.
Scheduled Reports Settings
Field | Description | ||||||||||||||||||||
|---|---|---|---|---|---|---|---|---|---|---|---|---|---|---|---|---|---|---|---|---|---|
Send to: | Enter one or more email addresses to receive the report. Click Add to add each email address. | ||||||||||||||||||||
From: | Enter an email address from which email appear to be sent, e.g. reports@yourwebtitan.com. | ||||||||||||||||||||
Subject: | Specify the subject for the email. | ||||||||||||||||||||
Description: | Enter any text you want to appear in the body of the email. | ||||||||||||||||||||
Filter: | Specify the report filter (if any) to be applied to the report. | ||||||||||||||||||||
Number of records: | Specify the maximum number of records that can appear in the report, e.g. to receive a 'Top 20' report, enter 20 here. | ||||||||||||||||||||
Format: | Choose if the format of the report will be PDF or CSV. | ||||||||||||||||||||
Date Range: | This specifies what date range to include in the report:
| ||||||||||||||||||||
Frequency: | Use this drop-down list to select the frequency at which the report is run:
|