Downloading and Installing OTG 2 for Mac
The steps below describe a command-line installation of WebTitan OTG 2 for Mac on a single machine. You need admin privileges for a machine to complete these steps.
During installation, you will be required to:
Run two separate commands:
An install command to deploy the .PKG file.
A WebTitan Cloud configuration command that you must edit with your own parameters. An example script that you can edit is given in the steps below.
Allow a WebTitan Cloud system extension under the General tab in Security & Privacy Preferences.
Allow the DNS Proxy Configurations pop up. A DNS proxy provider is a network extension that implements DNS proxying. WebTitan OTG 2 for Mac uses the DNS proxy provider to forward DNS requests to the OTG DNS server, which records the DNS requests. For privacy reasons, a user must give consent to enable it.
Select your Mac operating system below and follow the steps to download and install OTG for Mac:
Using MacOS MacBook Air 15
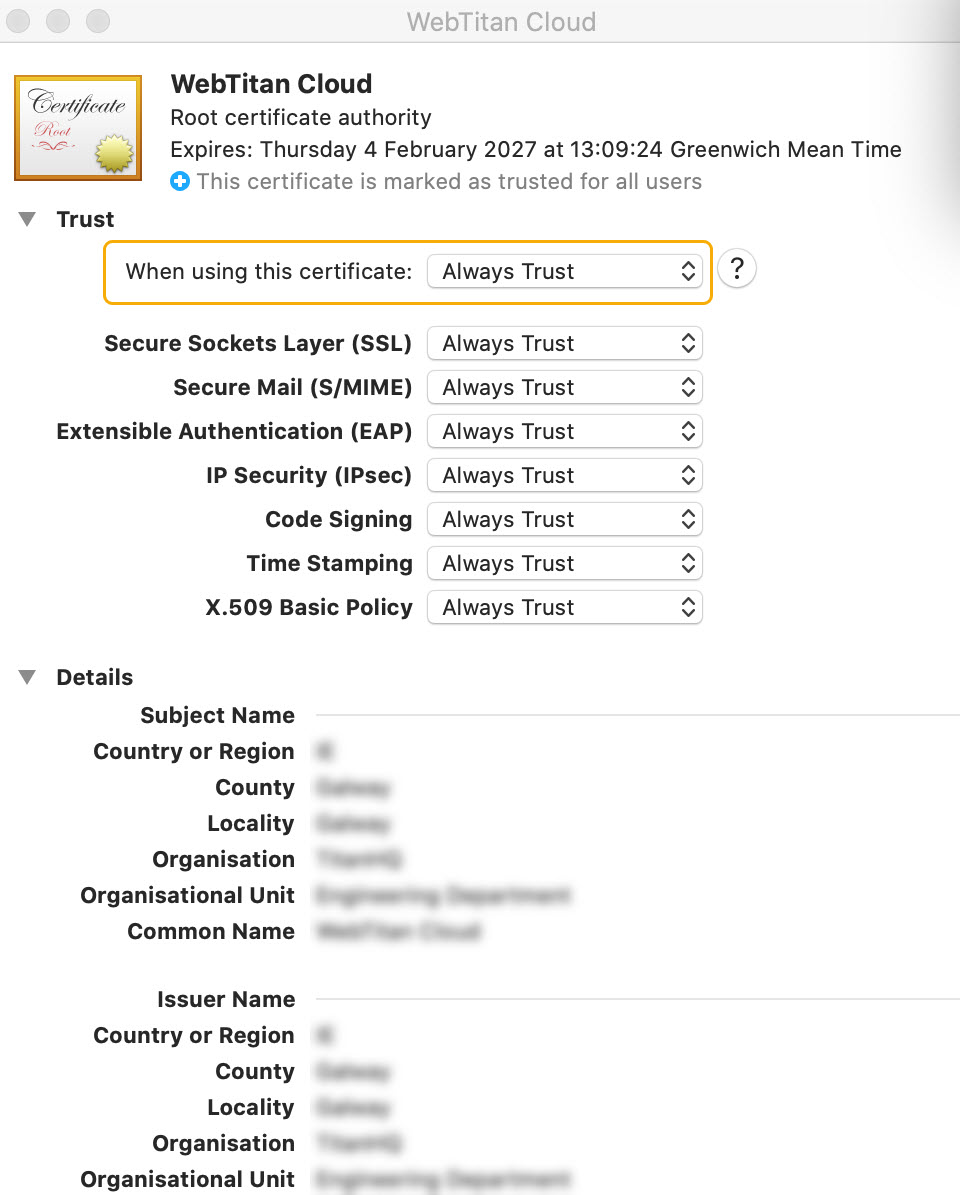
Step 1: Download and install your WebTitan Cloud 4K certificate.
If an SSL certificate has not been installed and a user visits an HTTPS enabled website that is blocked by a policy, their browser will return a certificate error page instead of your WebTitan block page. To avoid this, download and import the WebTitan SSL Certificate.
In WebTitan, go to Settings > SSL Certificates (a Customer Admin can go to Tools > SSL Certificate).
Download your 4K WebTitan certificate and install to your Mac keychain. See https://support.apple.com/en-ie/guide/keychain-access/kyca2431/mac.
Ensure When using this certificate is set to Always Trust as shown below:
Step 2: Download and install WebTitan OTG 2 for Mac.
Ensure you have administrative privileges, then follow the steps below to install WebTitan OTG 2 for Mac.
Click here to download the WebTitan OTG 2 for Mac install file (otg_setup.pkg). The current version of OTG 2 for Mac is 2.0.3 (2). You need to know what folder this install file saves to in later steps.
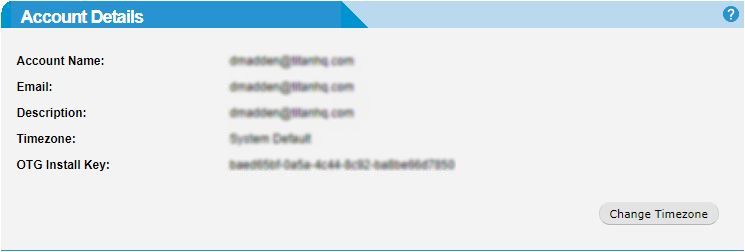
Retrieve the OTG 2 install key from your WebTitan Cloud. Go to Settings > Account and note the OTG Install Key:
Create the command script for installation. Base your script on the example shown below, but with parameters edited for your WebTitan Cloud.
/Applications/WebTitanCloud.app/Contents/MacOS/WebTitanCloud RPC_URL="https://mycloud.webtitancloud.com" INSTALL_KEY="00000z0z-0zz0-0000-zz0z-0zz000z0zz0z"Important
If your WebTitan login URL is https://ui-us-east.webtitancloud.com/ your RPC_URL parameter must include port 443. For example:
/Applications/WebTitanCloud.app/Contents/MacOS/WebTitanCloud RPC_URL="https://ui-us-east.webtitancloud.com:443" INSTALL_KEY="00000z0z-0zz0-0000-zz0z-0zz000z0zz0z"There are two required parameters described in the table below that must be edited when creating your own script.
There is also an optional parameter described that you can use during installation, but it is not necessary.
The command must be on a single line with no line breaks.
Required Parameters
Description
Example
RPC_URL
The URL of your WebTitan Cloud instance in FQDN format.
Caution
Your WebTitan IP is not accepted as the RPC_URL parameter.
You can get the FQDN by opening a command prompt in windows and typing nslookup followed by the IP of your WebTitan Cloud. For example,
nslookup 198.51.100.0.https://wtc1.webtitancloud.comINSTALL_KEY
This is the OTG install key used to register an OTG 2 device on WebTitan Cloud. You can get this in your WebTitan Cloud from Settings > Account and noting the OTG Install Key.
00000z0z-0zz0-0000-zz0z-0zz000z0zz0zOptional Parameter(s)
Description
Example
LOCATION_NAME
When OTG 2 is installed, a virtual location is automatically created for a device on WebTitan and given a default name. However, you can specify a location name to use with the LOCATION_NAME parameter on install.
A virtual location can either be created on WebTitan before installation and then the name can be used in this parameter, or, if not already created, the virtual location is created and assigned the name given in this parameter on install.
LOCATION_NAME=Training-PCOpen a terminal and change directory to the same directory as the install file you downloaded in Step 1. To change directory, type
cdfollowed by the file path you want to change to. For example:cd ~/DownloadsRun the following command script to initiate installation:
sudo installer -pkg otg_setup.pkg -target /When you receive the notification Terminal would like to access files in the download folder?, select Allow.
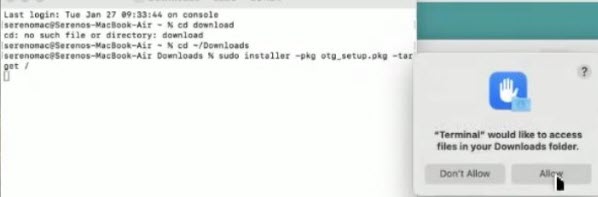
Enter your admin password if prompted.
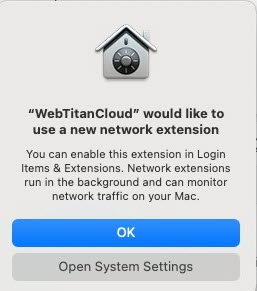
At the prompt WebTitanCloud would like to use a new network extension, select OK.
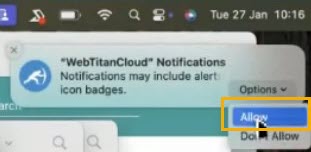
Go to Notification Preferences, and select Options.
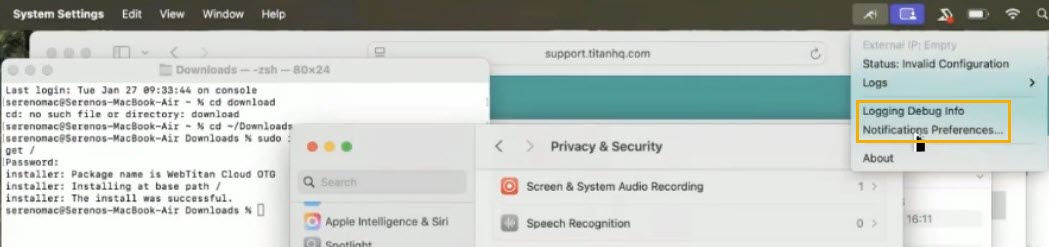
Select Allow.
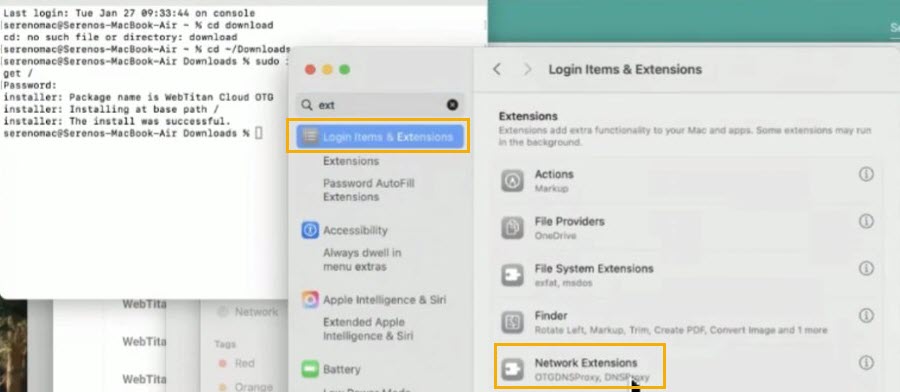
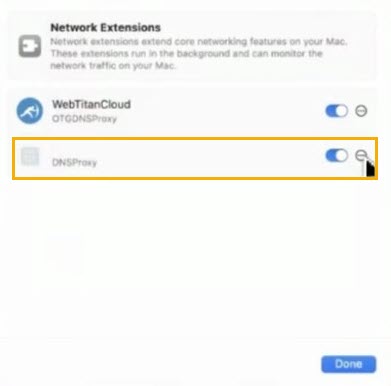
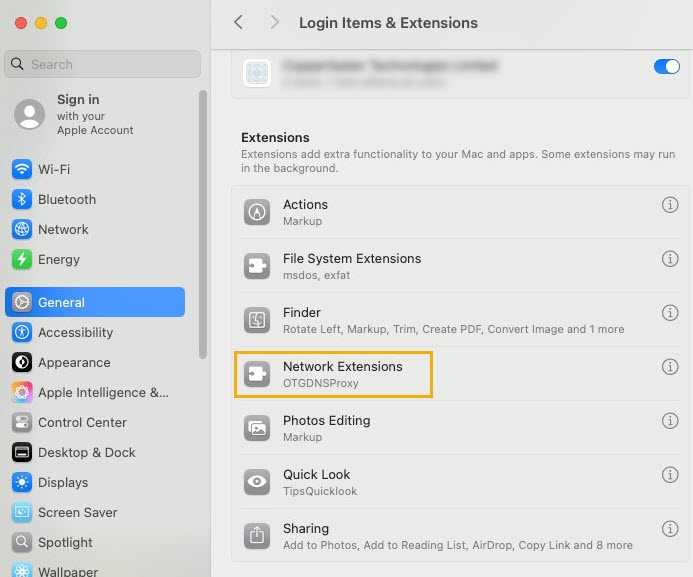
Go to Login Items & Extensions > Network Extensions.
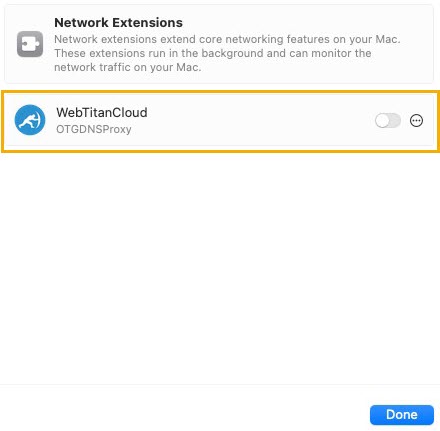
Enable WebTitan Cloud.
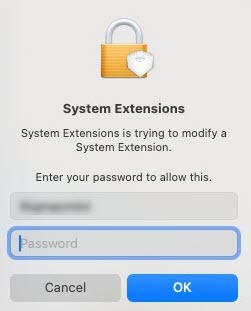
In the System Extensions pop-up, enter your password, and select OK.

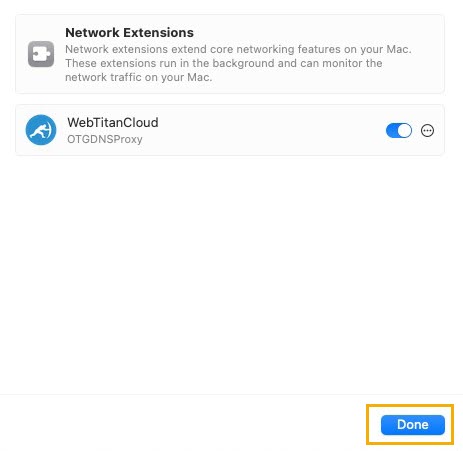
Enable DNS Proxy and select Done.
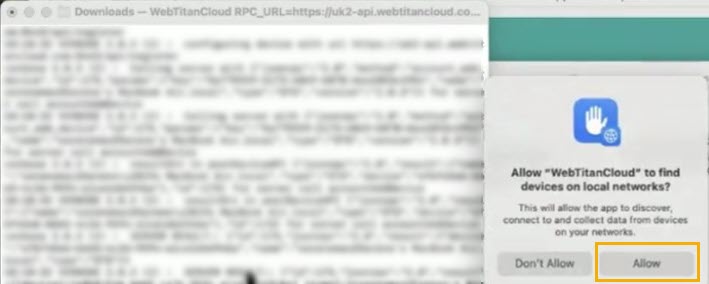
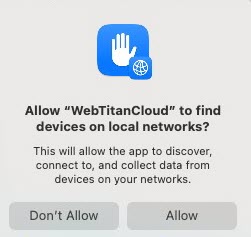
Run the script, and when prompted to Allow WebTitanCloud to find devices on local networks?’, select Allow.
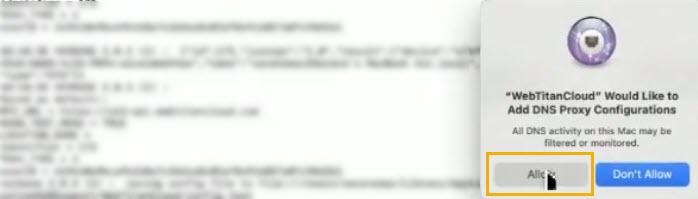
When prompted by the message WebtitanCloud would like to add DNS Proxy Configurations, select Allow.
When the agent has been downloaded successfully, status will show as Connected.
Once the steps above are complete, the best way to verify the installation is to check that a device and the associated user and location have been added to WebTitan.
Using MacOS Mac Mini Sequoia 15.7.2
Step 1: Download and install your WebTitan 4K certificate.
If an SSL certificate has not been installed and a user visits an HTTPS enabled website that is blocked by a policy, their browser will return a certificate error page instead of your WebTitan block page. To avoid this, download and import the WebTitan SSL Certificate.
In WebTitan, go to Settings > SSL Certificates (a Customer Admin can go to Tools > SSL Certificate).
Download your 4K WebTitan certificate and install to your Mac keychain. See https://support.apple.com/en-ie/guide/keychain-access/kyca2431/mac.
Ensure When using this certificate is set to Always Trust as shown below:
Step 2: Download and install WebTitan OTG 2 for Mac.
Ensure you have administrative privileges, then follow the steps below to install WebTitan OTG 2 for Mac.
Click here to download the WebTitan OTG 2 for Mac install file (otg_setup.pkg). The current version of OTG 2 for Mac is 2.0.3 (2). You need to know what folder this install file saves to in later steps.
Retrieve the OTG 2 install key from your WebTitan Cloud. Go to Settings > Account and note the OTG Install Key:
Create the command script for installation. Base your script on the example shown below, but with parameters edited for your WebTitan Cloud.
/Applications/WebTitanCloud.app/Contents/MacOS/WebTitanCloud RPC_URL="https://mycloud.webtitancloud.com" INSTALL_KEY="00000z0z-0zz0-0000-zz0z-0zz000z0zz0z"Important
If your WebTitan login URL is https://ui-us-east.webtitancloud.com/ your RPC_URL parameter must include port 443. For example:
/Applications/WebTitanCloud.app/Contents/MacOS/WebTitanCloud RPC_URL="https://ui-us-east.webtitancloud.com:443" INSTALL_KEY="00000z0z-0zz0-0000-zz0z-0zz000z0zz0z"There are two required parameters described in the table below that must be edited when creating your own script.
There is also an optional parameter described that you can use during installation, but it is not necessary.
The command must be on a single line with no line breaks.
Required Parameters
Description
Example
RPC_URL
The URL of your WebTitan Cloud instance in FQDN format.
Caution
Your WebTitan IP is not accepted as the RPC_URL parameter.
You can get the FQDN by opening a command prompt in windows and typing nslookup followed by the IP of your WebTitan Cloud. For example,
nslookup 198.51.100.0.https://wtc1.webtitancloud.comINSTALL_KEY
This is the OTG install key used to register an OTG 2 device on WebTitan Cloud. You can get this in your WebTitan Cloud from Settings > Account and noting the OTG Install Key.
00000z0z-0zz0-0000-zz0z-0zz000z0zz0zOptional Parameter(s)
Description
Example
LOCATION_NAME
When OTG 2 is installed, a virtual location is automatically created for a device on WebTitan and given a default name. However, you can specify a location name to use with the LOCATION_NAME parameter on install.
A virtual location can either be created on WebTitan before installation and then the name can be used in this parameter, or, if not already created, the virtual location is created and assigned the name given in this parameter on install.
LOCATION_NAME=Training-PCOpen a terminal and change directory to the same directory as the install file you downloaded in Step 1. To change directory, type
cdfollowed by the file path you want to change to. For example:cd ~/DownloadsRun the following command script to initiate installation:
sudo installer -pkg otg_setup.pkg -target /At the prompt WebTitanCloud would like to use a new network extension, select OK.

Run the command:
/Applications/WebTitanCloud.app/Contents/MacOS/WebTitanCloud RPC_URL=https://demo-ui.webtitancloud.com" INSTALL_KEY="b1672097-6e68-4dc7-a36d-b4cbd3984919
At the prompt, Allow WebTitanCloud to find devices on local networks?, select Allow.
Go to General > Login items & Extensions, and select Network Extensions (OTGDNSProxy).
Enable WebTitanCloud (OTGDNSProxy).

In the System Extensions pop-up, enter the password, and select OK.
Select Done.
Once the steps above are complete, the best way to verify the installation is to check that a device and the associated user and location have been added to WebTitan.
Using MacOS Mac Mini Tahoe 26.2
Step 1: Download and install your WebTitan Cloud 4K certificate.
If an SSL certificate has not been installed and a user visits an HTTPS enabled website that is blocked by a policy, their browser will return a certificate error page instead of your WebTitan block page. To avoid this, download and import the WebTitan SSL Certificate.
In WebTitan, go to Settings > SSL Certificates (a Customer Admin can go to Tools > SSL Certificate).
Download your 4K WebTitan certificate and install to your Mac keychain. See https://support.apple.com/en-ie/guide/keychain-access/kyca2431/mac.
Ensure When using this certificate is set to Always Trust as shown below:
Step 2: Download and install WebTitan OTG 2 for Mac.
Ensure you have administrative privileges, then follow the steps below to install WebTitan OTG 2 for Mac.
Click here to download the WebTitan OTG 2 for Mac install file (otg_setup.pkg). The current version of OTG 2 for Mac is 2.0.3 (2). You need to know what folder this install file saves to in later steps.
Retrieve the OTG 2 install key from your WebTitan Cloud. Go to Settings > Account and note the OTG Install Key:
Create the command script for installation. Base your script on the example shown below, but with parameters edited for your WebTitan Cloud.
/Applications/WebTitanCloud.app/Contents/MacOS/WebTitanCloud RPC_URL="https://mycloud.webtitancloud.com" INSTALL_KEY="00000z0z-0zz0-0000-zz0z-0zz000z0zz0z"Important
If your WebTitan login URL is https://ui-us-east.webtitancloud.com/ your RPC_URL parameter must include port 443. For example:
/Applications/WebTitanCloud.app/Contents/MacOS/WebTitanCloud RPC_URL="https://ui-us-east.webtitancloud.com:443" INSTALL_KEY="00000z0z-0zz0-0000-zz0z-0zz000z0zz0z"There are two required parameters described in the table below that must be edited when creating your own script.
There is also an optional parameter described that you can use during installation, but it is not necessary.
The command must be on a single line with no line breaks.
Required Parameters
Description
Example
RPC_URL
The URL of your WebTitan Cloud instance in FQDN format.
Caution
Your WebTitan IP is not accepted as the RPC_URL parameter.
You can get the FQDN by opening a command prompt in windows and typing nslookup followed by the IP of your WebTitan Cloud. For example,
nslookup 198.51.100.0.https://wtc1.webtitancloud.comINSTALL_KEY
This is the OTG install key used to register an OTG 2 device on WebTitan Cloud. You can get this in your WebTitan Cloud from Settings > Account and noting the OTG Install Key.
00000z0z-0zz0-0000-zz0z-0zz000z0zz0zOptional Parameter(s)
Description
Example
LOCATION_NAME
When OTG 2 is installed, a virtual location is automatically created for a device on WebTitan and given a default name. However, you can specify a location name to use with the LOCATION_NAME parameter on install.
A virtual location can either be created on WebTitan before installation and then the name can be used in this parameter, or, if not already created, the virtual location is created and assigned the name given in this parameter on install.
LOCATION_NAME=Training-PCOpen a terminal and change directory to the same directory as the install file you downloaded in Step 1. To change directory, type
cdfollowed by the file path you want to change to. For example:cd ~/DownloadsRun the following command script to initiate installation:
sudo installer -pkg otg_setup.pkg -target /At the prompt WebTitanCloud would like to use a new network extension, select OK.
Run the command:
/Applications/WebTitanCloud.app/Contents/MacOS/WebTitanCloud RPC_URL=https://demo-ui.webtitancloud.com" INSTALL_KEY="b1672097-6e68-4dc7-a36d-b4cbd3984919
Go to General > Login items & Extensions, and select WebTitanCloud (Network Extension).
Enable Network Extension.
In the Login Items pop-up, enter the password, and select OK.
Select Done.
Once the steps above are complete, the best way to verify the installation is to check that a device and the associated user and location have been added to WebTitan.