Deploying OTG 2 Using Intune
This information relates to deploying WebTitan OTG 2 to multiple users. This is typically done using a system admin's preferred Remote Monitoring and Management (RMM) software. The example below describes a Microsoft Intune deployment.
Follow the steps below to deploy WebTitan OTG 2 using Microsoft Intune, which is part of the Microsoft Endpoint Manager platform.
Important
As a best practice, test your deployment using a limited test group with just one or two users first before full deployment.
Click here to download the WebTitan OTG 2 for Windows install file (setup.msi). The current version is 2.2.23. You need to know what folder this install file saves to in later steps (default: Downloads folder).
Go to your Microsoft Intune admin center (Microsoft Endpoint Manager).
Choose Apps from the side-bar menu.
Click the
 Add icon to create a new application to deploy OTG 2 for Windows.
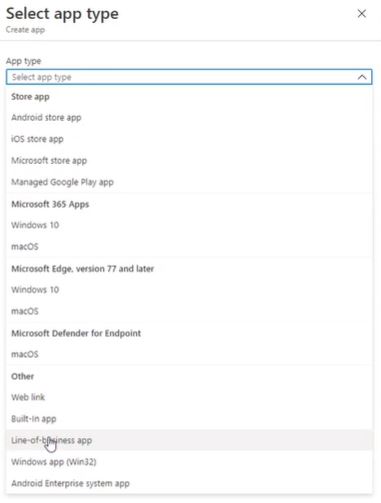
From the Select app type menu on the right of the screen choose Line-of-business app and click Select.

Note
The line-of-business app is the recommended app type for the MSI install file format.
In the Add App window click Select app package file and the App package file pane displays.
Click the file
 icon and select the install file downloaded in Step 1.
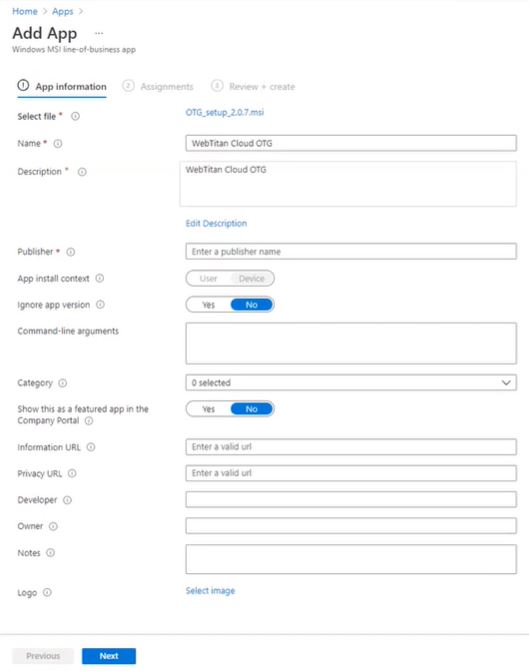
Click OK and the App Information page displays.

In the Command-line arguments field, enter your install script for OTG 2. Base your install script on the example shown below, but with parameters edited for your WebTitan Cloud.
/qn /passive /L* installer_log.log RPC_URL=https://mycloud.webtitancloud.com:7771 INSTALL_KEY=00000z0z-0zz0-0000-zz0z-0zz000z0zz0zThere are two required parameters described in the table below that must be edited when creating your own script. There are additional optional parameters that you can use during installation - see OTG 2 Installation Parameters.
It is recommended that you use the FULL_CLEAN optional parameter in your OTG 2 install script if you are moving from OTG 1 to OTG 2 to fully clear OTG 1 files.
Use the PREFER_MASTER_CONFIG=true parameter to ensure duplicate devices are not created on WebTitan.
The command must be on a single line with no line breaks.
/qn,/passiveor/quietare required msiexec options. See MSI Installation Options for more information on msiexec options.
Required Parameter
Description
Example
RPC_URL
The URL and (optional) port number of your WebTitan Cloud instance. You can get the FQDN by opening a command prompt in windows and typing nslookup followed by the IP of your WebTitan Cloud. For example,
nslookup 1.2.3.4.The RPC port is always port 7771 and is automatically added if not included in the RPC_URL parameter. The examples show the accepted formats.
wtc1.webtitancloud.comwtc1.webtitancloud.com:7771https://wtc1.webtitancloud.comhttps://wtc1.webtitancloud.com:7771https://wtc1.webtitancloud.com:7771/INSTALL_KEY
This is the OTG install key used to register an OTG 2 device on WebTitan Cloud. You can get this in your WebTitan Cloud from Settings > Account and noting the OTG Install Key.
00000z0z-0zz0-0000-zz0z-0zz000z0zz0zThe other fields on the App information page are based on your own preferences and company procedures, so complete as required.
Click Next and the Assignments page displays.
From the Assignments page, select the users you want to deploy to. Click Add group to select a group from your active directory.
Caution
It is recommended that you test your deployment using a test group with just one or two users first before rolling out fully.
Once you have assigned users to this application, WebTitan OTG 2 for Windows will start rolling out to them.
While it is not necessary for a successful installation, restarting a machine is recommended after installation.
You can click Monitor in the side-bar menu and Device install status to view the progress of your deployment. However, the best way to validate rollout is to check if devices have been added to your WebTitan Cloud.