Downloading and Installing WADA
Follow the steps below to download and install WebTitan Active Directory Agent (WADA).
Click here to download the WADA install file-wada.exe.
Launch an elevated command prompt as described here and run wada.exe with administrator privileges:
Click Windows Start and in the search box type cmd.
Right-click on cmd.exe and choose Run as Administrator:
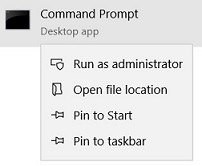
Click Yes and the Administrator: Command Prompt window displays.
Change directory so you are in the same directory as the wada.exe file downloaded in step 1 and run wada.exe.
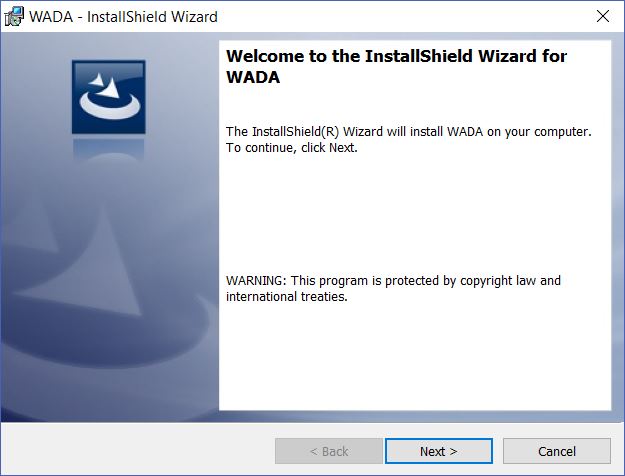
The WADA-InstallSheild Wizard window displays. Click Next.
Accept the license agreement and click Next.
Change the install Destination Folder or leave as the default. Click Next.
Click Install.
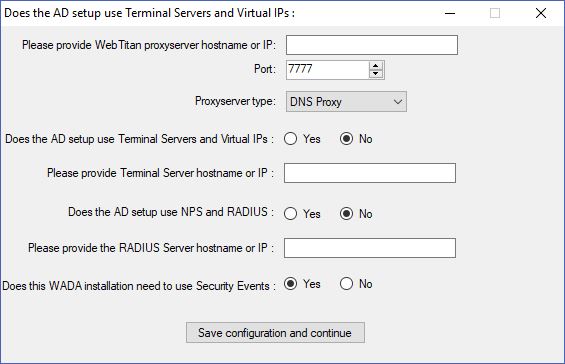
The 'Does the AD setup use Terminal Servers and Virtual IPs' window displays. Use the table below to complete the fields:
Field
Description
Please provide WebTitan proxyserver hostname or IP:
Enter the hostname or IP assigned to your DNS Proxy during installation.
Port:
Default is 7777 (this is the port when WADA is being installed with DNS Proxy).
If this is only a WebTitan Gateway installation, select WebTitan as the Proxyserver type below and enter 8881 as the port.
Proxyserver type:
Default is DNS Proxy.
Use WebTitan if installing WADA without DNS Proxy. In this case, the Port should be set to 8881 (see above).
Does the AD setup use Terminal Servers and Virtual IPs:
In order for WADA to identify Virtual IP's on your network, it must know which servers are operating as terminal servers. If using terminal servers, select Yes.
Note
Terminal Servers and Virtual IP identification are currently supported only on WebTitan Gateway and not on WebTitan Cloud.
Please provide Terminal Server hostname or IP:
If you select Yes above, enter the hostname or IP address for your terminal server(s).
Multiple hostnames or IPs may be entered. They must be comma separated and not contain any spaces, e.g. server1.abc.local,Server2.abc.local
Does the AD setup use NPS and RADIUS:
Select Yes to tell WADA to listen for RADIUS server Wi-Fi based events. Your Wi-Fi access points need to be enabled with RADIUS accounting and have RADIUS Attribute 8 Framed-IP-Address capability.
Please provide the RADIUS hostname or IP:
Enter the hostname or IP address for your RADIUS server.
Multiple hostnames or IPs may be entered. They must be comma separated and not contain any spaces, e.g. server1.abc.local,Server2.abc.local
Does this WADA installation need to use Security Events:
Select Yes to allow WADA to access the log that contains records of login/logout activity. It is recommended to select Yes.
Select No only if WADA is being installed on a RADIUS server or a terminal server and it is already installed on the authenticating domain controller.
Click Save configuration and continue.
You will be prompted to enter a User name and Password for Web Titan AD Agent. Add the credentials of a domain user the WADA service will run under.
Note
The credentials used must be those of a Domain Administrator.
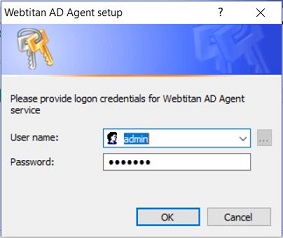
Click OK. WADA will complete the installation.
Click Finish.