Add Actions to Your Real-Time Event
After you've created an event, it will appear in the Realtime Response Events list of event subscriptions. To add actions to the event, do the following:
Go to your SafeTitan portal, and select Real-Time Integrations > Real-Time Response Events from the menu on the left.
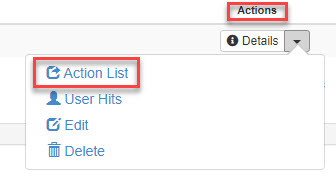
Find the event that you want to add an action to, and under the Actions column, select the dropdown arrow beside Details. Then select Action List.
Select Create Real-Time Response Action.

In the window that opens, configure the actions for the event as follows:
Action Type: From the dropdown menu, select the type of action that will be performed when a user triggers the event:
Organization Message: Select this option if you want the user to receive a pre-configured email message.
Training: If you select Training, then the user will be sent training to complete.
Skype for Business IM: Select this option if you want the user to receive an instant message through Skype for Business.
Action Level: From this dropdown menu, you can choose when you want the action type to be triggered.
Trigger Only Once: This option means that the action will only be performed once; that is, the first time the the event is triggered.
Trigger After N Events: "N" equals the threshold number that you enter in the Threshold Value field. If you select this option, then the action is performed after the user reaches the threshold you've set.
Trigger After Every Event: Selecting this option means that the action is performed every time the alert has been triggered.
Threshold value: You need to enter a number here if you have selected Trigger After N Events. The number that you enter is the number of actions a user can perform before the event is triggered.
Trigger On: You have the option to specify the minute, hour, day, week, month, and year that you want the subscription to be active. Depending on the option you select, you'll be prompted to make additional selections.
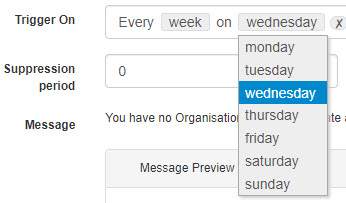
If for example, you select week, then you'll be given the option to select a specific day. In this example, the action will be active every week on a Wednesday.
Suppression Period: The suppression period is a cooling-off period in which events are not listened to and not counted.
IM Response: Only applicable if Skype for business IM is selected as an Action Type. Select the applicable IM Response from the dropdown menu.
Message Preview: Only applicable if Organization Message or Skype for business IM is selected as an Action Type. You can preview the message that you want to send to your user.
Select a Training Topic: Only applicable if Training is selected as an Action Type. Select the training topic, such as Email Security, Social Engineering, Authentication, and so on from the dropdown list.
Select a Training Course: Only applicable if Training is selected as an Action Type. Select the course, related to your chosen topic. Note that this menu selection will change, depending on the topic you've chosen.
Training Campaign Name: Only applicable if Training is selected as an Action Type. Enter a name for the Training Campaign, which will appear on your campaign list.
Is Active: When set to Yes, then the action(s) will be performed when the event is triggered.
Cc: Enter the email address of the person you want to be notified when the event is triggered.
Select Save Event Action.

You can repeat these steps for every action you want to associate with an event.